A light weekend

Not much happened last weekend, other than going up and hanging out on the boat for the day, and finally getting my lazy self to work with some soap to scrub some of the deck. It actually made the boat whiter. Who knew!

So that was how last weekend went. Now let's fast forward to the first weekend in August. Leading up to this week, my brother had been hoping he'd be spared a weekend at work and be able to come up and enjoy some weather. But with the nature of the beast, comes the last minute text that he would need to head back in on Saturday. Hopefully he can get up next weekend and enjoy taking it out, even if I won't be able to join due to some other stuff I have planned already. However, the bright lining is that I had talked to my dad earlier as well and told him he was more than welcome to join. So even though my brother couldn't, my dad could. It's always more fun to take the boat out with company. It also makes docking a whole lot less stressful, as long as they are on the same page as you are. Don't believe me? Well fine.

I had intended on going up Friday night after work, but had some minor surgery to perform on one of the cars. Up early to do that on Saturday, and I finally got loaded on the the road around 10:30 AM. After stopping to grab some quick food - hot dogs and sandwich ingredients, I arrived at the marina about five, ten minutes after my dad had. I was glad he didn't have to wait for me too long. Wasn't a lot to load up, so we tossed it in the boat and then decided to head to grab some lunch prior to going out. Treated to a Chicken Tender sub, and he went with the Shrimp Basket, courtesy of Giuseppe's Sub and Pizza. Heading back, we pushed off and headed out into the lake. Anyone want to take a guess where there wasn't any wind? So we floated around for a while. There wasn't even enough wave actions to flog the sails, that's how dead the weather ended up being. I took the opportunity to jump into the water and cool off a few times, and even floated around on a tube and scrubbed down the sides of the boat a little. The starboard side had been pretty dirty so it was nice to get that cleaned. And it's always satisfying to send some spiders into the abyss where nothing but fish await. OH! Speaking of fish, we did notice on the boat loading trip, an interesting one hovering at the dock. I didn't have my camera, but it was one of these:

I had to actually look it up to see what it was, and was surprised to learn that the Spotted Gar is indeed native to Ontario and as of 2016, classified as Endangered. Kinda cool.

We chose to head back in for the evening. It wasn't so much that there wasn't a good spot to anchor nearby with no wind to get us there, but more that this was the weekend of the annual Fair Point summer bash. In true weekender style, I managed to bork up the shift linkage in the outboard as we docked. This is a 9.9 Mercury outboard, with a tiller shift design. I wasn't sure I had turned the motor off in Neutral so I turned it, and CLUNK into reverse it went - never to return. Oh well, we'll deal with that tomorrow. For the time being, the Bash! A great live band, and catered with some good eats. Even a Tiki Bar! They do this every year, but was the first time I was actually going to be at the dock to take advantage of it. So that gave us dinner and entertainment. We headed back to the boat and sat in the cockpit as the stars started to come out. We discovered Mars looking pretty bright - just recently it was the closest it's been in 15 years, so it wasn't too surprising. We also saw a couple floating lanterns go high overhead. And we also saw what we can safely classify as a UFO. Aliens? Who knows, but definitely unknown. It looked quite high in the sky, as if a plane. But was moving relatively quick, to where my dad surmised it might be a satellite flying past. Except as we watched it, we noticed it had a waver in the line it was on. Out over the lake it went, no sound, and disappeared. It was quite strange.

We woke up around 7 Sunday morning. My dad headed to the shower, and I woke up shortly after. Well, no time like the present to tackle this outboard thing. A recent knee injury has me being slightly more cautious (usually) than I normally am with putting weight on it, so I waited for him to get back, and we moved the boat a little, so it was angled in the slip. This brings the stern in a lot closer and allows me to remove the outboard from the kicker bracket from the dock, instead of trying to lift it up over the stern. Then came the long trek up the dock carrying the dumb thing. It's only about 80 lbs or so but it's still a workout. We propped it on the tailgate of his truck and tried to figure out what could possibly be gumming up these works. We first tried to remove the lower unit, thinking maybe something got borked in there. But we couldn't really see anything, and it would only drop about an inch and a half. So we abandoned hope of it being in the lower, and turned our attention back to the linkages under the cowl. The way this works, is there is a cable system from the tiller. This turns a cog wheel thing that not only operates a linkage to the throttle, but then also shifts gear. But for some reason, this sucker wouldn't shift! Finally my dad suggested we unbolt the piece that turns the shift, so we popped that 10mm bolt off, and bingo, instantly let us move things. It looked as if somehow, it skipped a tooth, is the best way to describe it. Here's a parts diagram for this thing, so you can see what I'm talking about:

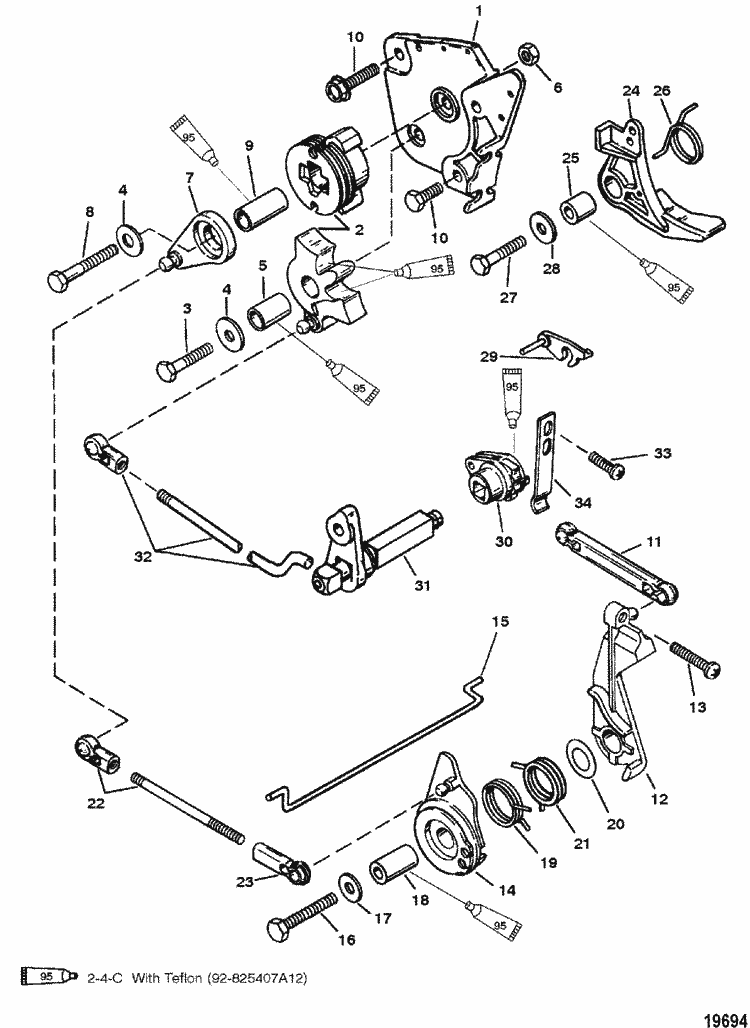
So on this diagram, the shift assembly is #2 - two pieces that mesh together and turn in concert when the handle moves. There's a nut (#6 on the diagram) on the other end of the bolt that had us a little nervous since there's no way to get to it without removing the whole mess, but we chanced it. After removing the lower section of the shift assembly and re-aligning it, we put it back together and woohoo, we have shifting again! I tightened the bolt, and if I'm honest, I couldn't swear the nut wasn't turning on the other end, but it did feel relatively snug, and there's a bushing that the plastic piece sits over anyway. Back to the boat! Hefted the outboard back onto the bracket, and started the motor, shifted to Forward, yay! Shift back to Ne---no. Nothing. Now we're stuck in Forward. Talk about a "WTF" moment. I pulled the cowl, and that bolt had loosened up almost completely. This let the assembly not give any good bite, and wouldn't shift. I think what happened, looking back, is that when we first put the bolt in, it didn't REALLY get a bite on the nut. But this time, I said well, worth a shot.. and grabbed the wrench and it actually tightened up properly again. Ok, sweet. Problem solved. Until it changed problems.

I started the motor, shifted both directions multiple times, ok, so far so good. Wait.. why is there water pouring from the leg and not out where it should? Sonofa... I jumped onto a YouTube video of someone changing the impeller. There's a long copper tube from the top of the motor, down the leg. Then, there's a rubber sleeve, that slips over that, and then down onto the impeller housing in the lower unit. So what happened, we figure, is when we pulled the lower unit and even though it only got down an inch, it was far enough to dislodge that sleeve off the tube, so when it was running, it was just flooding water up the leg, and not up the tube. I also found the little clip shown in the video, that was holding everything from coming out. So we removed the pin from that, pulled everything down, reassembled properly, and FINALLY, we have water running, we have shifting. We even have a breeze. Away we go!

We had only a light breeze, about 1-2 knots of boat speed leaving the channel into the lake, and headed North for a while, as that's basically where it would take us. The sun was out, hardly any wisp of clouds, but we were moving, and that's what mattered. We chatted for a bit before he retired to the cabin for a nap for a bit. At that point, the wind slowly built up so we had a good 3+ knots of smooth sailing towards the West. After another hour, I decided to swing back around. I had a hunch the breeze was going to subside, and I figured if I turned back, it would mean a shorter motor back into the dock if it came to that. Dad woke up, and we had slowed a little bit, but we did continue making our way East towards the shore, and circled around a larger motor yacht anchored out. As we turned back towards the marina, it started getting pretty fluky on the wind front, so, a mile or so from the channel, we just dropped the sails and motored the rest of the way in. We had a smooth soft landing into the dock, and started unloading. It didn't take too long, and I let him head out while I buttoned the rest up. Overall a nice sunny weekend, and if you take out the no wind on Saturday, and the 2 hours of messing with the motor Sunday morning, it was pretty pleasant. I even took my new little Breeze 4k drone out for a test drive. Well, in the marina. I want to get a feel for it before I take it out and about on the water.

That's Crappy

This past weekend was nice and rainy. What better weather to do some unwanted boat jobs in! My plan back when I was trying to sort out my head issues (not the mental ones, those need more than a weekend), was to remove the existing system and move to a temporary portapotty setup. Ideally I would plumb a new system from scratch, holding tank, etc. Let's recap though, why mine was junk:

The hoses were God-awful. I didn't stuff my nose against them, but even looking at them, there must've been some permeation there. Not to mention that the toilet didn't even actually work. Now maybe it could've been rebuilt.. but why? And on top of that, the plumbing was all wrong anyway. In my particular boat, the holding tank was an old 6 gallon cell, mounted (and loosely at that) under the port side of the rear of the V-berth. I say loosely, as I realized during this project that there should've been a shelf to mount it on, which had since been destroyed and long gone. The intake hose for the toilet wasn't even plumbed to anything, so the only way to have tried to flush would be to dump water in the bowl, either from the sink or cups or something. Not convenient. The tank itself may have been salvageable if not for the giant gaping hole on top that someone shoved some plastic dryer vent hose in an attempt to vent the fumes out. Yeah, duct taping that into a roughly cut gaping hole is SURE to do wonders.

If you're at all interested, here's a link to that youtube fiasco.

So I went up on Saturday, got there in the afternoon. I intended to start working on it then, but then got thinking that for the sake of self-preservation, I would just relax on board until Sunday, and then tackle it. That way I wasn't elbow deep in yucky stuff, and having to leave anything open while I tried to sleep.

So instead, I arranged my new foam that arrived that morning, in the cabin. Nothing covered yet, and I mis-remembered my V-berth size so it's a little on the small side, but it should be a nice change to have actual cushions when I'm done. Saturday night was just spent with some internet surfing, and watching Netflix. Side note: One day of binge-watching Netflix on whatever my auto-bandwidth settings are on, blows through a 15 gig hotspot allowance.

Sunday arrived, and despite my not wanting to get dirty, it was time. I donned my fancy Harbor Freight respirator, and some heavy yellow gloves, and got to work. First step was the head itself. On the Newport 28, there's really no access to the bottom of the shelf that the head sits on. This means that if the bolt starts spinning, you rapidly run out of options. There are three bolts, two on the "bowl" side, and one just under the front of the handle. One nut came off nice and easy. One was more stubborn, and the last, even more stubborn still. But with a combination of jamming a flathead screwdriver under the washer with upward pressure - this pulls the head of the bolt underneath tighter to the underside of the shelf, which adds more friction and ideally would be enough to stop the bolt from spinning while undoing the nut - so I succeeded after a while. I also learned it's surprisingly warm wearing a respirator, even when the temperature is under 70 degrees.

Before I could pull the head out though, I needed to unhook the discharge hose from the holding tank. Now this is where it starts getting disgusting. You can skip to the end if you're squeamish. The hose came off the fitting on the holding tank relatively easy. It also was not empty. This meant I needed to keep the end up high enough to not dump anything in the boat, but not so high that it overflowed the bowl going backwards. In a perfect world, I'd have a cap of some sort to put on the end. It is not a perfect world. I used a copious amount of duct tape to make a "hopefully this is good enough" seal on the end, and laid out a double-layer of trash bags in the head compartment. Pulling the head up, I put it in the bags, and then pulled the hose through the bulkhead quickly enough to get it looped into the bag and all tied off with very minimal um...spillage. The intake hose was no issue, since it wasn't freaking hooked to anything!

The next steps were to try to free the hoses from their places. The hose that went from the holding tank to the manual pump and outward to the discharge thruhull was remarkably stubborn. So much so that I decided to remove the entire assembly - minus the hose that had gone between the pump and thruhull. I had decided to flush that hose with water and so opened the thruhull which started a steady pinhole leak out of the side, on the upper side of the valve. Closing it, no water. Opening, water. So, rather than risk extra strain by yanking on an old hose, that one got a pass to stay. I had to actually remove the cover to the holding tank with the hoses attached. It was a lot of not looking, and a lot of holding my breath out of reflex. After an hour or so, I finally managed to get everything else out, minus that one hose. They were all stuffed into layers upon layers of sealed trash bags, and carefully positioned upright to avoid spillage.

After sponge-cleaning out the rest of the v-berth compartments, the installation of the Dometic was pretty straight forward. I popped the box open, and found myself a nice little surprise. When I had decided this was the model I was going to purchase, I needed to determine which version. They have two colors, and they also have a standard equipment, and an MSD kit version. The latter includes a fitting that replaces the pour-out spout on the holding tank with a cap with fittings for a pumpout hose and vent. My understanding was that the cap replaced the spout in the package, and most forum posts I could find didn't really lead me to think otherwise. And since the price of the version I bought with the MSD kit was so much cheaper than the other, I assumed it couldn't possibly.

I popped the box, pulled it apart and voila! Best of all worlds. The holding tank had the spout cap pre-installed and the pump-out cap sitting quietly in a bag, waiting to be used. I haven't ordered new hose yet as I wasn't sure how long a run I would need, so I left the spout in place to use it as an actual porta unit instead of permanent. The holding clamps are a vast improvement over the plastic ones on my Thetford on the last boat. It didn't take more than ten minutes to lay out the brackets, pre-drill the holes, and screw them down. I did go up another 1/16" on the drill bit size to make it a little easier, which didn't make it any less sturdy.

So now, let's hope we don't need it.

Early Father's Day

June 9-13 I took the week of June 10th off from work, and as luck would have it, the weather looked at the outset to be mostly cooperative for the upcoming days. I spoke with my dad towards the end of last week, and invited him up to the boat to come out sailing. He wasn't going to be able to make it for the weekend, but hoped to come up on Monday perhaps. So with that to hopefully look forward to, I packed up the still-ailing car and drove my way up to the lake. Saturday was a very uneventful day. I did exactly nothing. Well not exactly, but I rounded up. I played online for a bit, and watched some Supernatural on Netflix for a bit. But I did actually do a couple productive things! I repainted the hatch and chain locker cover the same shade of blue that the hull is. I don't think I took a picture afterwards to compare, but through the magic of Paint, I present a before and after:


Yes, you're allowed to laugh at my skill. But anyway, I figured that until I can repaint everything a proper shade of white on deck, at least this makes them look like appropriate accents instead of that faded light blue blandness. I also managed to figure out how to get my $15 USB GPS puck to work with my laptop! Long story short, there's a Virtual Comm Port download that turns your USB device into exactly what it says - a virtual port. Once that's done, just simply select the port in Open CPN (my choice) or whatever you're using, and voila! Had a good solid fix even in the cabin at the table in about ten seconds. More on that a little later.

So Sunday rolled around, and about 9 AM I woke up to a slight breeze. Figuring it would be a nice day out, I decided to back myself out of the slip and head out to sea, er, lake. Now one of the things that I did before departing, was to rig a small line to the topping lift block that was dangling above the mast. I thought if I could make that work, it would be easier than the supporting hook on the backstay when it came time to raise the main. I rigged the jib prior to leaving so I wouldn't have to bounce around on deck, and headed through the channel.

The first thing that happened, was that the topping lift line just went POOF! right through the block, sending it swinging all over (it eventually wrapped around a shroud enough that it stopped). Then it turns out, I ran the starboard jib sheets INSIDE the shrouds, instead of out. I tell you, I was a right old mess out of the gate. But once I got sorted, it was a very long downwind leg to a few miles shy of Sodus Bay before I decided to turn around. The upwind beat back to Fair Haven took a few hours, and gave me a good time to note that the shrouds needed another turn or two on the buckles, and also that I could stand in the companionway on the steps with the tiller extension and avoid a majority of the breeze and spray. Go me! It was a little under six hours from dock to dock, and a shade over 19 miles. I know this because what I DIDN'T know, was that Open CPN will track your trips for ya! How fancy is that?! And it also gives a breakdown along the way, with coordinates, speeds, elapsed times, and the like. Quite impressive, and that's just scratching the surface.

Once I got back to the dock, it was only minutes before my Dad gave me a call to let me know that he'd be able to come up after all. We set a time the next morning for arrival, made a small checklist of goodies to grab, and I buckled in for the evening to get some rest after cleaning the boat up and taking non-essential bits to the car. He arrived around noon-ish, and we had a few hot dogs on the boat, and walked around a little before taking off. The conditions were almost identical to what I had Sunday - average of 10 knots of wind from the Northeast, with some decent swell, but very easy and quick for a downwind run. This time we went down past Sodus, to my favorite little anchorage down there. It's halfway between Sodus Bay, and Fairbanks Point. It's barely a cove, but the wind was forecast to swing Southward so we'd be protected and it's always made for great scenery on the waking hour. As it happened, the swell didn't want to get any better until the very early morning hours, and this new-to-me boat has quite a few creaks and groans. I believe it's in part due to this boat having a liner in the cabin, but regardless, the wind being JUST off-kilter from the waves, would turn us back and forth between a smooth silent moment, and a rolling, groaning one. The anchor held fine with 6:1 scope through the night, even with that ride but by morning, it had calmed to nothingness. And it's just hard to beat a sunset on the lake.

We sailed off anchor (that's a lot of faith in my ability to pull the outboard rope twenty times in succession to get it to start, if something goes wrong), and turned a little West, as I had never actually been further than my little spot. The breeze was just a little puffy here and there but we actually did manage a couple miles before turning back around and heading upwind. It was slow to start, but the wind eventually did shift South, and we had a very nice beam reach, that eventually turned into a close reach, until we got to the marina once again. The reason we ducked back in on Tuesday night, even though he had more time available, was the wind and weather for Wed and Thursday was forecast to increase to gusts up to and over 40 knots. I have faith in my boat and anchor, but I'm also practical. All in all we did about 43 miles down and back, and treated ourselves to a pizza at the local shop for lunch.

The overnight sleep at the dock was quite a contrast to the bounce house we slept in for Monday night, which I'm sure my Dad was grateful for. I've bounced around even at the dock a bit before, and it really was just the creaking that kept me up a little longer than average on that night, but for him, this was the first time overnight on the water this year, and that must've been hard to get used to. Wednesday morning treated us to a pretty stiff Southerly breeze, and a few drops on the window from the night. The big difference was the sea state on the lake - There was more wind, less swell, probably because it was coming FROM a shallow water direction instead of towards it. Brunch was burgers, and then we got him packed up and on the way before the rain started. I took a little longer to get my junk rounded up. I also made the mistake of forgetting where I was. I had the companionway hatch slid closed because it had started raining lightly, so in my hurry to go load some stuff into the car, I grabbed arms full and went to bound up the steps - straight up into the hatch. I sat down rather quick.

It looks worse than it was, I'm sure. I was more annoyed at myself that I forgot about the hatch and felt like an idiot. But I soldiered on and packed up, heading home finally. All in all, it was a pretty great trip. 5 Days on the boat, and some good quality time with Dad along the way.

Since getting home, I did manage to fix the rear axle u-joint on my car, and more importantly, ordered the new Dometic SaniPottie 975MSD for the boat, along with - drum roll please - new foam to make cushions out of! It remains to be seen how well this comes out, but I bought some foam from Thefoamfactory.com which comes pre-cut in the dimensions you wish. They even do V-berth cushions complete with the little notch at the bottom. However, since the notch is off-center for the Newport 28, I opted for just a straight trapezoid shape in the overall size, and I can cut that out after it arrives. I ordered the foam for the V-berth, and two more pieces for the seats in the main cabin. You can also have the pieces pre-wrapped with fiberfill to make your cushions nice and smooth. I still have to order up the material, and then after we see how they come out, there's the quarter berth cushion left, and the seat backs. If I get really daring, maybe cockpit cushions too!

Happy Father's Day to all those out there!

A breath of air

Saturday, May 12th. Oh good, the forecast calls for rain. But that's ok, it was only supposed to rain for the morning, and then a relatively calm rest of the day, and Sunday was only looking like cloudy with light winds. I'll take that. I packed up the latest parts that arrived, and headed up. This included new LED fixtures for the bow navigation lights, a Raymarine 4DVS fish finder (for the depth meter), a length of dyneema, couple new stanchions, and another length of VHF cable. As expected, the weather was a little dreary for the drive up, but not really rainy. More mist than anything. I've gotten in the habit of watching the webcam that the marina has streaming, to get an idea of what the weather up there is like. Well that, and to make sure the boat is still afloat. If you're of the curious mind, that link is here. The weather up there matched what I drove through, and by the time I arrived, what little rain had fallen was done and over, and it was just a cool overcast day on the water. The first step I decided, was to mount the 24" LCD TV on the starboard bulkhead. That took a matter of minutes, and didn't really give me as much of a sense of accomplishment as I had hoped it would.

Next, I decided to unveil the new electronic gadget and give it a whirl. Pretty boring there as well. All I had to do was screw it to the barely there wooden piece that was on the cabin bulkhead, conveniently screwing into the wood where it was over a previous open cutout for a gauge of some sort. This was to eliminate any more holes than needed to be there, even though the plan is to glass that over again later this summer anyway. But for now, it mounted there, I ran the wire for it alongside the old gauge that's still there, and - you know, now that I think of it, I should've run power to that gauge to see if it worked. Wouldn't that be something? The transducer was the only uncertain aspect of this deal, but as with most, I decided that if I used a nice big seal of toilet-bowl wax between it and the solid glass hull, it should act as a shoot-through-the-hull fixture. My biggest issue then became where to put it. Eventually I decided upon underneath the starboard seating area, as close to the centerline as I could, and as far forward as it would let me, which should put it just about at the leading edge of the keel. By some rudimentary math, it should stay below the waterline unless I'm on a starboard tack with about 30 degrees heel, which I likely won't be doing when I'm that close to shore where depth is an issue. You can see it in this picture from the next day.

The problem with going up early on a day you know you won't be sailing, is that you rapidly run out of things to do! Ok, lifeline next? Since I'm still one stanchion short, and since I don't have gate hooks or anything yet, I simply lashed the existing eye thimble to one side of the stern rail, ran it up through three stanchions on the starboard side, across the bow fittings, back through two on the port, and tied it off. Better than nothing (barely, if I'm honest). But until I get the final stanchion ordered, and the proper hardware, there's no point in splicing into it. Well since I'm on deck, let's replace the navigation fixtures. Three tiny screws each side, and then the wires pull right out of the old bases, and feed the new wire in, screw back down, and done. Quite literally a ten minute job for both sides, and other than the port fixture using flat headed screws and the starboard using Phillips, there were no issues there.

At this point, I was getting a little bored of things going so easily, so I decided to challenge myself with wiring my inverter to the starboard side 110v outlets. The boat originally had shore power set up, and that would feed four household outlets - one on the starboard main bulkhead in the cabin, one starboard in the V-berth, one in the bathroom, and one on port side by the galley sink. I've since removed all the shore power connections, and disconnected the wire where it had branched off, but the wiring for the outlets is still intact for the most part. My plan was easy - wire a new plug on the end of the starboard outlet run, and plug it into my inverter. When I want them to work, I switch the inverter on. This too, went off with only one minor hiccup, in that I originally installed the plug on a pair of wires without paying attention, and that was just a pair of 18/2 marine wire that ran to the hanging locker but with nothing attached. Once I realized my mistake, I changed it around, and bingo, done. Granted, it turns out the Display Port to HDMI adapter I have in my laptop bag doesn't seem to carry audio like my last adapter did, but otherwise, it worked fine. It also meant I could plug my laptop into the outlet on the wall instead of running a cord back to the inverter and risking tripping over it. So at least that worked. I tried hooking up the USB GPS puck I bought, but got nowhere at all with that, and didn't feel like messing with that too much.

I wound down with a couple sandwiches, and some Netflix, and called it an early night.

SUNDAY SUNDAY SUNDAY!

I woke up and it was pretty breezy, and still a little cool, but in short order, the sun came out and other than wind being a little more than I was hoping for, it was a nice day. My biggest issue was just that I was out by myself. Sure, now I can turn the outboard left and right, but I was still solo. The wind was from the South, which in my slip was blowing me off my pier. This would mean as soon as I left the dock lines go, I was going to blow across the slip pretty quick without anyone else to help maintain control. So instead, I emptied out the anchor locker, and swapped things around a little. I eliminated the old dried out lines in the chain locker, and straightened out the roll of 100' 3/8" Walmart special. I shackled my new 25' of chain to the end, and wired that with some safety wire. Then I put removed the tiny two anchors in the locker, and tried to hook the larger Danforth onto the chain, only to then realize it won't physically fit in the locker. With the absence of anchor hangers on the bow, I removed it and put it back in the cockpit locker. I have 200' of 1/2" line to replace that smaller stuff with anyway.

One nice feature of the Victron SmartSolar MPPT controller, is that it has built in Bluetooth which you can connect your phone to, and get information about your system at a glance. So around noon, with a decent sunny day, I took a peek. Simple button presses, and you get a nice shiny screen. Plenty more screens too, but the first one is the one most people will look at:

I also decided to get a better handle on the head and holding tank situation. Goodness, what a mess. Not just because of what it contains, but how it did so. I took a quick video to explain how it was set up, which you can check out here if you want, but the short version is: There's normally a thru-hull somewhere, that the head draws water from. In this case, I can find none. Anywhere. The hose that feeds INTO the head for water, is just capped off under the V-berth. From there, the discharge goes into a fitting on the top of the holding tank. The outlet of the tank has a Tee in the line, one goes through a manual pump and to a discharge thru-hull, which I can't use being on an inland lake. The other side snakes a long way around to a fitting (mislabeled) on the starboard deck. There are two vent lines from the top, one that goes alongside the pumpout hose, and the other into the chain locker. This normally wouldn't be as bad as it might sound, if it wasn't for that the fill for the freshwater tank, is IN the chain locker. I don't know who designed it, but it was unsmart. It's also something I intend to change soon. But soon is not now.

While I do want to replace and re-plumb everything brand new, that's a few hundred dollars worth of expense, and then the time, that I'd rather not have to outlay right now. Instead, the plan is to remove everything on board, and replace the fixed head with a Port Potti. In this case, I'm planning on going with something like this SaniPottie 975MSD from Defender:

This will allow me to have almost the same capacity to hold as the original 6 gallon holding tank was, at a lower initial cost, and I can still plump it (with new hose) to a pumpout fitting. This allows me to not need to haul it out of the boat if I don't wish, and it also more importantly, satisfies Canada's requirement for waste. A regular removable porta potti is not acceptable in the province of Ontario, so mounting this "permanently" with the kit, and hooking to a pumpout, solves that. One option was to just re-plumb the intake for the head into the sink drain thru-hull and use that sort of setup, but that would hinge on the rest of the system being ready to go and frankly I'm not sure it is. If you're curious to see how it's set up in shaky video form:

After I sorted that out, I decided that it was time to stop being a wimp, and get my hands wet. The wind had died down and shifted so there was no excuse to not get this boat out for her first sail with me at the helm. The outboard fired up fine, still surprises me every time, and I let it warm up. I backed out with a lot more control than I expected to have, and headed out to open water. The main is already tied on the boom, so once I got out into the lake with a little more wave action, I was able to hoist that relatively easily. The headsail, I had to actually get in place. I decided to feed it up through the hatch instead of hauling it up the deck the whole way, and it worked fine. It took little effort to raise, and other than having a bad sheet angle, I was soon able to move along at 4-5 knots, according to Navionics.

If you wish to see a little short clip under way, for whatever reason, here you go:

I only stayed out a little while, before I had to head back home. Docking was my biggest concern, with the displacement, and that I was solo. I secretly hoped for a dockhand, but since the A dock on the marina has yet to fill out, that was only a dream. I did manage to slow down enough, that aside from bumping the port side a little more onto the finger than I hoped, the boat actually didn't do too horrible coming in. In hindsight, I should've burst it into reverse a little more right as I entered which would've pulled the stern in more. Lessons learned for next time. Tied off, cleaned up, and away I went. The season has just begun.

Weekend in the water

Blue Skye was launched and made her way to the Fair Point slip on Wednesday, May 2nd of this year. As with any thing that you're excited about, you find ways once again to get back to it, so by the weekend, I was heading up once more. The third trip within a week. Kind of funny how the drive seems to not matter once the boat is in the water.

The main reason for going up was to just do some more boat projects. I was fairly certain I wouldn't take the boat out just yet, but there were things I wanted to look at, and address before that day would come. The first of which, and probably the most important, was to tackle the outboard situation. I can't remember if I mentioned in my splash thread, but the short version is this: The original A4 has long since been removed, and a kicker bracket mounted center of the transom. I have a Mercury 9.9 XL Shaft on that bracket. But the issues I had were a) the motor wouldn't steer, at all. Locked center, and try as I might, there's no simple "do this" step in the service manual. Just talks about how to hook up steering cables. And b) Even at the lowest setting, the bottom of this EXTRA LONG FREAKING SHAFT was barely in the water. How it managed to get me through those waves, God knows. Reverse was a nightmare, as the motor tried to kick upwards just enough that the prop, I swear, was skimming the surface, and all it seemed to do was just give me prop walk to port, but no real momentum.

So step 1, I found the barely noticeable set-screw that was locking the steering tube. Success, I can now steer the motor! This should certainly help with the reversing issue! I haven't tested that theory yet, but I can't imagine it would be a bad thing.

I also relocated that kicker bracket about 4 inches lower. Now, on full drop, the plate on the outboard sits properly where it should. Full raise, and I'm ALMOST out of the water (I still can't figure out how to tilt this f'n thing!) But at least with more bite under the water, I should also have a little more control and thrust, and then when I get around to swapping to a high-thrust prop after this season, that should take care of a bunch of things.

The other thing I did, was to mount my 100 watt solar panel on the stern rail. It's an HQST Monocrystalline panel, the slim model. I ran 10 gauge cabling down into a deck gland on the cockpit wall, and into my Victron MPPT controller. I need to get my adjustable support pole still, but even just tightened down on the clamps on the rail, it doesn't go anywhere without force being applied - even so, I used a couple lines to tie it off to keep it from dropping down.

I then finally dug out all the sails, and started hoisting and checking what the inventory really looked like. The first and most striking issue is that the main sail is from a Newport 27S, which is a different cut and about 20 square feet smaller. I also noticed that there are no jib tracks or cars present, which means that sail trim is going to be no easy feat in the interim. But the halyards and sheaves work just fine, and it was a productive weekend.

Launch Day - The Ride

The funny thing about the Great Lakes, of which Lake Ontario is the smallest, is how rapidly the weather can change. Wednesday's forecast, was mid 60's, and light breeze. And that's exactly what it was until about 3:30 PM. If you read the first part, you'll probably have put the math together that we left after 3:30 PM. After we managed to finally get turned around off the dock, we motored towards the mouth of the river channel, and that's when I realized that the waves might be a little higher than expected. So let me back up a spot, and add some filler.

Until I buy a new gas tank for this outboard, it's only got about a 3 gallon capacity. I judged it to be about half full, and so bought another 3 gallons on our way playing musical cars. Even with an untested outboard, my brain was saying that a 13 mile journey, at say, 5 knots, should only take,2, MAYBE 3 hours? And ok, if we were to assume a gallon per hour consumption, that still leaves me an additional 50% capacity in which to call a buffer. My brain was also factoring in light breeze and calm seas. And not an outboard that had the prop mere inches beneath the surface. Now I should also mention that it was a pure guess, since a motor of that size, pushing a boat of this size, and I truly don't know how much it actually sips or guzzles. I was spitballing. To be fair, some of my best work is done that way.

The first indication of rethinking the voyage was when we made the turn west out past the marker and directly into oncoming swell. It felt like every third wave, the prop was out of the water, the momentum would drop, and we'd have to build it back up. It felt like it took forever just to get going, and we probably hadn't even gone a mile before I was seriously questioning how much fuel I brought versus should have brought. Oh, and let me fill you in on the other fun part of this boat that I discovered not long before. There are anchors on this boat. Four of them, in fact. There are two in the bow which seem to be the kind you find at Walmart. Which frankly, I wouldn't even use as a lunch anchor on glass water. They're seriously that undersized. There is exactly zero chain. There's a few lengths of heavy rode, but maybe forty or fifty feet, max. There's also the remnants of what appeared to be a spool of 3/8" rode from again, Walmart is what comes to mind - only it was just as if someone had slid this pinecone shaped rode off the spool and kicked it in the locker. Not attached to anything, but had at least some length. Another anchor is a small collapsible 4 bladed thing in a bag with maybe another hundred feet of rode. I call this a dinghy delight. And then, I finally found an appropriate sized danforth in the cockpit locker. Just chilling around, not hooked to anything, just.. there. The reason I bring this up, is because my mind was already trying to make an escape plan if the worst should happen. Even a mile out, I had never run this particular motor under load, much less any length of time. Who knows what might happen there. Perhaps the conditions would suck so much fuel up, we'd run out. The rig wasn't fully tuned at the dock (because it wasn't supposed to be bad weather, and even in the channel wasn't THAT bad so when I had decided to motor the journey, we decided the rig could wait. Bad call. We probably could've gotten away with it on the fly, adjusting as we bounced but I prefer not to. The main was on and lashed, but with 15 knot winds here and there, it would be a last resort.

We pressed on, doing what we could to zig and zag between swells, until we finally could make enough of a turn more southerly where the waves weren't breaking straight on. This allowed the outboard to keep from coming up and out, and progress started being a possibility. I focused instead, on a point up ahead on the lake, West Ninemile Point. I estimated it to be the halfway point of the journey. I had already put a little more gas in the outboard tank, leaving what looked to be about 2 gallons in reserve. I decided that as long as we at least made it there, then we should have enough fuel to last. Spoiler alert, we did. Though maybe I shouldn't have sounded so sure of myself when my dad asked if we had enough to make it. Pft, of course we do. We ended with probably a half gallon, maybe three quarters, left. Totally reasonable. But, we did start to make progress. It was slow, but it was there. A running joke was "At least we haven't sunk yet!" in reference to the leak from earlier. At one point, I climbed to the bow - did I mention I have no lifelines at all, and missing stanchions? Because safety. Seems to sit a little higher than my last one, but it was quite a fun ride, while I tightened down the forestay a little more. This poor boat was getting bounced and loaded around pretty good, even under motor.

Finally we near the home stretch. A few miles to go, I've emptied the rest of the fuel into the tank (Dad asks "did you save any?" - Nope. Not that it would've mattered, since if it ran out of the main tank, I'd use the rest anyway. If it has room, use it. If we were going to run out completely, it wasn't going to matter what tank the last drop came from). And that's when we see the rain moving across the lake to our starboard. It gets darker over Oswego behind us. Down to the last two miles. Rain drops. Well that's fun. Waves that had started subsiding at least a little, built back up to where they were. And then the lightning starts flashing around us, the thunder. Well, I guess this trip is a little for everyone, eh?

Through the rain, we could still make out the navigational lights at the end of the channel into Little Sodus Bay. Plenty of gas left to my untrained estimate by shaking the tank. Ok, no nerves there. Time to just get in there. Fortunately we didn't have to worry about the fenders being on the wrong side, since I was docking to port anyway. Sun was fading closer to the horizon, so it was going to start getting darker quickly as we turn into the channel. Once we made the turn, the waves that had been coming across our starboard bow, now were being redirected and pushing us along into the channel, and into the bay where the waves had all but vanished. Getting behind the breakwall into Fair Point, nice and peaceful. At this point, I knew the motor would be given another test - dropping back to idle in gear, or neutral. Remember, this thing has tiller controls but because of it, there's no revving up in neutral if it starts to sputter. But it held just fine, we pulled into the slip as nicely as could be at about Eight O'clock PM, and tied her off. Grabbed my bag of clothes and my keys, and we were done. Four hours of fun, really. But at that point, the boat had survived, we had survived, and what better way to spend a Wednesday evening!

Launch Day - Getting Wet

After scheduling my launch for Wednesday morning, May 2nd, at 11 AM, I decided that I would head up late Tuesday night. On my drive up, my dad gave me a call and offered to come up and help, and that would also solve my problem of how to get my car back. So I said sure, that'd be great, just heading up now and that would give me time to get up earlier, already be on site, and get the new Sheave Divider figured out. When I put the new ones in on Monday, I noticed that the new ones fit about perfect, but the old ones on the aft side had a slight gap in between them, and it left just enough doubt in my mind about the halyards jumping and getting jammed. Since it's the kind of thing that only happens in the worst time, I thought I should fix that. The other thing I needed to do was to source some more clevis pins for the rigging, as almost all the existing ones were either missing, or in the case of a couple shrouds, were galvanized carriage bolts that were already being worn through. Luckily most of the stores in Oswego open up at 7 AM during the weekdays. Stop one was Walmart for a drink, and more importantly, a plastic-y-composite-ish clipboard that happened to be about 1/8" thick. Ran over to Lowe's and bought them out of 3/8 clevis pins, Harbor Freight for some more, and back to the boat. With an eye on the clock, I went to work cutting the board into a small spacer section that would cover the aft half of the masthead, slid between those sheaves. Worked perfectly. I then went through and plopped pins in all the rigging.

After that, I thought hey, I have some of this JB WaterWeld, I'll stuff some around the old prop shaft. I mean, what's the worst that it could do, just not.. do anything? So I did that. Then I touched up the paint on the port side of the hull that got scraped away before I purchased it. So at this point, it was waiting for my dad to arrive. 11 was near approaching, and he later told me traffic had slowed him down. I stumbled upon the discovery that the ropes I had been kicking around under the cabin table were actually two pre-made halyards with shackles, so we quickly threaded them through in replacement of the old ones. And now, we were ready to go! Or pray. One of the two.

Bernie at Oswego Marina was great to work with. The launch and mast step were pre-paid by the previous owner from the winter storage, so it was just a matter of doing it. He backed the hydraulic trailer expertly, and loaded the boat. I'm used to a travel lift, so this was a new, and slightly nerve wracking experience. But after moving it over to the slings, suddenly she was in the air, and dangling over the water.

Once she settled into the water, Bernie gave us time to jump below and see how she looked. My dad, ever observant, looked down in the cockpit hatch because the stern tube would've been a place I would think I might see leaks. Remember, there's no motor, hasn't been in forever, so who knows what kind of shape that equipment was in. Even with WaterWeld over it, there's no knowing. First thing he saw was what looked like questionable fiberglass, but from everything I could tell it was the old rusted corner of the gas tank that had just made a mess of things. Still dry back there, other than a little water pooled behind the tank, but it wasn't anything coming in, it was just there.

Then we went into the cabin and wouldn't you know it, the next phrase was something like "Well there's water here." Well I hadn't looked there recently, but I was pretty sure I didn't remember any under there last time I looked! He was looking under the port settee and sure enough, about two inches of water pooled underneath. Very clear water, not like it had been dirty from sitting or dripping down the hull. Well then... There are a few thru-hulls on that side of the boat. There's a sink drain, the intake for the head, and two older thru hulls that were likely depth sounders or the like. Underneath the boat, they look like they'd been painted over - inside the hull, one was missing and appeared to have a plug in it's place, and the other had it's wire cut off. After careful wiping with countless towels and such, we realized the plugged one was where it was seeping in. It wouldn't have sunk the boat, but it would've been something to really try to keep up with, and that's just not acceptable.

My first feeling, was.. words I would rather not repeat. I didn't vocalize anything much, but inside I was quite disheartened. When I had my last boat, I replaced thru-hulls all new, and glassed over ones I wouldn't need. These looked visually fine inside and out so I never gave them too much thought. So as thoughts of what to do raced through my heads, my dad suggested maybe we could tighten it? So I grabbed my channel lock pliers and cranked down on the nut holding the plug in. No change. Then he pointed out that he meant on the actual backing nut for the thru-hull. Oh. Duh. Right. I managed to get a lock on it. All in all, it might have had about 1/8 of a turn in it, but it did seem to stop the leak. Or at least slowed it that we couldn't see it actually seeping any more. Phew. We ran to the others and inspected, and all showed dry. So, on that note, it was time to get the boat to the other side of the slips to get the mast raised.

How many of you know about prop walk, and the like? Ok, plenty of hands. The outboard I have on this boat, is a Mercury 9.9 Extra Long Shaft model. Thankfully (even though it's not ideal for many folks) it has tiller controls for gear selection. While this requires that the engine be kept more delicately in tune because there's no revving in neutral, it does give the option to control the progress with one hand on the boat tiller and one on the motor without having to reach for the gear selector. Mind you, this motor had only been run for ten minutes or so at home prior to this. Thankfully it fired right up and settled into a decent idle. So as you can see from the above pictures, we're backwards in the slings. Not knowing how this boat was going to handle - it's twice as heavy as my last boat - I thought it would be best to swing the bow out, and then allow me to drive forward out, up past the regular slips, spin around in the nice wide channel of the Oswego river, and come back into the dockside for raising the mast. And good ol Bernie walks the boat back, and kicks the stern off, assuming I'm going to back it the entire way down (which I had mentioned a few times that I was planning otherwise..).

Let's revisit sailboat steering for a moment. When you get into the upper 20s in feet, or anything without an outboard, the boat is steered with the water disrupted by the angle of the rudder, either moved by tiller or wheel. The water moving over the change in the angle pushes the stern of the boat, causing the turn. Let me emphasize that. Water MOVING over the rudder. You have to be moving, to turn. On smaller boats with an outboard that can be steered, you can turn the outboard to thrust it one way or another whilst starting to move. On a boat with a fixed motor, or in my case an outboard that couldn't be turned, you have to get some water speed up before the boat will react. A 9.9 horsepower motor with a standard prop, I admit, is underpowered for the boat. It will work fine, yes. But it's really a little weak, at least in standard prop form. Once it gets moving, sure it'll keep the boat moving, but the initial thrust is weak. It's weaker when the outboard isn't sitting properly down in the water where it should. And it's even worse in reverse when the natural tendency of an outboard is to rise up due to the thrust, especially so shallow already.

We ended up doing a K-turn in a boat. Basically reverse was going nowhere, so I tried getting movement forward to try to turn the boat. And it became rapidly clear that I was not going to make enough speed to make the turn very quickly, before driving straight onto the rocks that you see in the left side of the photos above. Desperate to avoid running aground, I twisted into reverse. Instead of instantly stopping the boat, it instead just more or less churned the top of the water in frustration, but had the added unintended effect of giving me a sharp prop-walk reaction to port. Happily, this was exactly where I wanted to go. So in doing that, it gave me enough room to forward, and eventually get going the proper direction. And sure enough, once we got out and I could speed up, the extra speed made it easy to just spin right back around and come in to the dockside, to tie up for the mast.

The mast raising went without incident, if you discount that I almost forgot to tighten the masthead bolts back in from my sheave divider install. We got the mast up, and Bernie gave us the ok to leave the boat tied up while we ran one of the cars to Fair Point Marina where we would end up, so that we would have way to come back and get the other car. We got to Fair Point easily, and stopped for some Friendly's on the way back. Arriving back to the boat a little before four, we had one more thing to sort out. One of the halyards was through a spreader so I tied a wrench to a thin line I had, and after about two dozen attempts, got the throw right and straightened it out. Now, we were faced with once again being pointed in the wrong direction. More than that, the wind had started picking up a bit and the clouds were coming in which cooled the day down a little. But, on the plus side, the wind was coming from the Southwest, so I had the genius idea of just releasing the stern, letting the wind and waves carry the stern out and around, and use the bow as a pivot until we were turned around. Which worked great in my head, but in practice, my dad cast off the bow a little early and.. we needed another 97 point turn to get out. Well, not really, but we did have to thrust reverse to curve a little, and then trying to get enough speed, we needed every inch of the working space to get that sucker to turn 180 degrees. But, after all that, we were finally pointed in the right direction. And if only that had been the hardest part.

99 percent

What an interesting weekend. I'm going to save people the trouble, and give the abridged version so they don't have to read through all the long bits if they don't want. And, go!

So it's finally splash time. I figured I'd take the weekend, spend it on the boat, and tie up all the loose ends that needed tying, and then Monday would be launch day. Turns out Mother Nature had other plans - Cold and wet on Saturday when I went up, which negated doing much. It was SNOWING on Sunday morning when I woke up. And today, Monday, was more cold all morning, then the sun came out, but the wind never subsided. Hence, no launch today.

What I did get done though, was:

* Installed the Steaming/Deck combo light on the mast.
* Ran all new wire for the mast, including the VHF cable
* Ran new wire from the electrical panel to the mast step in the cabin
* Wired the bilge switch
* Sorted out the cabin wiring
* Installed the new Masthead Sheaves and re-ran the halyards
* Mounted the VHF antenna, and Anchor Light
* Other bits and things.

So it was three days on the boat, all of them cold, and windy, and I got little things done. So if you don't want to hear the long drawn-out version, feel free to head off to wherever you're off to next. For those who like self-imposed torture, you be warned.

Saturday:

I got up early, at least for me, and decided that before doing anything, I would replace the vacuum line to the brake booster on my car. The old one had split really bad, and though taping it up heavily with electrical tape sealed a good portion of the leak that was tripping codes on the reader, it still left me with manual brakes only. This had gone on way too long, so that was job one. I have slightly better brakes now! And must still have just enough of a leak where codes are staring to manifest again. Fix one thing, five break. One more year car.. one more.

Loading up for the lake was an adventure in and of itself. I drive a 2003 Jaguar XJR - right before Ford started bloating them up in '04, and is one of the last years they had that truly classic XJ-series look to them. Unfortunately, it also means a pretty small trunk when it really comes down to it. And in this wonderful (tempermental) car, I had to figure out how to fit an outboard, a ladder, the gas tank, an extra gas can, clothes, my laptop and camera, tool box, box full of epoxy, another box full of parts and pieces, and countless other things. Which, thank you very much, I succeeded in doing. So onward to the lake! I stopped in Cortland for some Wendy's, because by this point, it was near 1:30 or so. I left there a dry person, and quickly was glad to be in the car - a pretty hefty rainstorm passed through as I made my way up towards Syracuse, which slowed traffic on the highway a good bit. Soldiering on though, I arrived just after 3 PM. Matt had left the Sapphire Blue paint on the blocks by the keep, for the touch up that will eventually be done.

I unloaded the car, plugged my extension cord into the power at the building and ran it to the boat. Inside, I fired up my trusty little Walmart heater, and the Halogen work light - combined, they do a fair amount of heating in the cabin. It was certainly going to be better than the night it was fifteen degrees, but still would be appreciated. The problem I had, was that the majority of what I wanted to do was outside work. Mast work on the wiring, the sheaves, working on the deck fitting for the electrical, and so on. I wasn't exactly wearing survival gear, but it still was drizzling on and off long enough that it was miserable to try to do much for long outside. The object was to not become fully soaked to a degree that would make drying out a long process. I passed the time by running to the store for a few things, like a new clevis pin that would work with the new sheaves in the masthead. Apparently stores only stock 2" long pins in a 3/8 diameter. I should've measured... but I took a gamble, and it turned out to be just right. Too wet to mess with that, I did about the only other things I could - I got the old steaming light off the mast, which was basically just glued on. I also went to the masthead, and cut off the connectors up there which weren't even doing anything. A few more rain drops, then I went out again and pulled the existing wiring with some new taped to it, for the new combo light. That didn't go as planned - all it succeeded in doing was pulling a bird's nest from up inside the mast out and showering over my head, and the tape came undone anyway. I saved the egg and set it aside. Not my fault, don't build a house in another man's mast.

I finally gave up for the evening on Saturday and just buckled down inside. Fired up the laptop and watched some more Volvo Ocean race highlights, and tinkered with the bilge pump wiring. Which is to say, I ran the wire up to the ground block, the positive up, and temporarily mounted the bilge pump switch under the main location. I really do need a finished piece to mount everything to soon.

Doesn't look like much, but it's something to start with, and by weekend's end, it was pretty much all wired as far as the panel goes. That was it for Saturday, so I climbed into the port berth, turned off the halogen and slept with the quiet whir of the heater keeping up with the weather.

I woke up Sunday to being snowed on. Well, outside, the boat didn't have the hatch open or anything. I decided that I needed a few things from the store. One of the things I had done during my wiring fiasco was to notice a previous VHF cable hole near the masthead that someone had tried to fill in with what looked to be like JB weld. I tapped it with a screwdriver and it popped out easily, so that solved my dilemma of how to get the VHF cable through. But I needed some grommets for the hole. So a trip to Harbor Freight and that was solved. Except it wasn't - turns out the grommets in their assorted pack are for about 1/16" depths an the mast is easily double that in thickness. But between that and some extra taping and heat shrink, we should be fine. It just got to the point where it was cold and rainy enough, that I couldn't really get much done. I finally got the combo light riveted in place (crooked by 1/4 inch which I hate myself for but it was hard to gauge with the mast laying half crooked in a cradle). I had originally decided on launching on Monday, but the forecast for that day was going to be really windy so I knew I wouldn't be getting much of anywhere. So in between rain drops, I decided to run the rest of the wire up the mast. I have a fish tape, how hard can this be? As it turns out, there are foam inserts about every ten feet in the mast. The fish tape wasn't going to cut it. Another trip to Lowes for 40' of PVC pipe, and bingo. Push them through from one side to the other, run the fish tape down it, tape everything to the other end, and pull everrrrrything back out. This included the VHF cable and one pair of wires from end to and, and another pair of wire to the steaming light. The wire is Red and Yellow in the jacket. So I have Red #1, Yellow #1, Red #2, and Yellow #2. Yellow 1 is going to be a common ground. Red 1 is the anchor light, Red 2 is the steaming light, and red 3 is the Deck light. This is made a little easier by the combo light having a single shared ground lead feeding off it. By the time I got done running that, I was ready to duck back inside for the day. I was just tired of being cold. I watched a few more shows in between running new lengths of wire from the panel back to the feed up to where the mast plug would be. I couldn't really put the new plugs and socket in place, since it was still cold and wet, so I just left it all in place.

Monday came around, and it was quite blustery. I didn't do much when I got up, just moved some stuff inside. For some reason, I found myself really tired still, and laid down for another hour or so. I woke up to sunshine, and slightly better temperatures. By better, I mean over 40. I took the time to finally, FINALLY get the new masthead sheaves in. It was a fairly simple process, other than I tackled it a crazy way. Since the sheaves I needed to put in were on the narrower end of the masthead, I had to remove the old ones on the aft side, and lower the new ones down from that end on some string to hold in place, and get everything lined up. Which also required removing the backstay pins and all that, but went pretty smooth. It wasn't until afterwards that I realized that the plate on the top of the masthead was just bolted on, and I could've just popped that off for full access. Go figure. At least they were in. With the sun coming out finally, I also took the time to mount the deck plug in place after soldering the wire together. I drilled some pilot holes, put down a layer of 5200 over the opening and previous holes, and screwed everything down. These connectors are something else though. I'll do more on those later. The mast wiring went just the same, other than dangling off the ladder with a hot soldering iron to reach it all. I had pre-tinned and filled the backside of the connectors with solder so that I had a head start with the wiring, and it went smooth.

After all that, I went home, for a much needed shower and night's sleep.

Getting closer!

So with a little over a week to go before the beginning of the season (I classify it as May 1st around here), it's time to get down to the nitty gritty. And by that, I mean.. being as broke as possible before getting on the water.

To recap the recent events as of late:

Couple weekends ago, I met with Matt, the previous owner, and picked up the 9.9 HP Mercury Extra Long Shaft outboard to go with the boat. The only downfall was that he hadn't found the fuel hose to bridge the tank and outboard. No worries, I'll go grab one from Wal-mart to play with it in the meantime. See, he told me that the motor had been looked at before, but he really didn't seem sure that it would be running 100%, so I thought I would just give it a look over. Imagine my surprise when the standard Mercury/Mariner fittings sold on the shelf, do NOT fit a 1988 Mercury outboard. They also sell the male fitting. Which, strangely, ALSO won't fit the female fitting they sell. So that was a bummer.

Then the weekend of the 7th, I was able to meet up with Matt again, to hand over the remaining balance for the actual boat purchase, sign the registration, and officially take ownership. Matt found the hose a couple days later and offered to mail it, so that was a nice bonus. Unfortunately the weather here has been unseasonably cold for the time of year and I haven't had any time, or daylight, to mess with it. That should change this weekend, when we might, MIGHT even hit 60 degrees! Woohoo, right?

So now it's a week and a half to go before the season opens. What do I have left to do?

Refit the masthead sheaves. To this end, I've ordered a new pair from Ballenger Spars, which was quite literally the ONLY place that I found the exact size needed already listed, without having to commission someone to create them special. And to that end, they were actually cheaper than most "close enough to work" sheaves that I found elsewhere. Whether or not they get here, that's the interesting question. Now, on the one hand, if they DO get here before next weekend, well then it's a party. I can replace the two missing ones with the new ones, and have free use of the spinnaker block and halyard for it's intended usage instead of it being tied up keeping head sail duties under wraps. Now, if they DON'T, well, the mast has been rigged with the aforementioned block doing duty and I'll just keep that orientation until I can climb up the mast and make the swap.

Mast Wiring. Right now, the mast wiring is nearly non-existant. The mast wiring on these boats come up through the deck-mounted mast step, and is sealed in the liner in the cabin. Unfortunately that means that if there are any breaks in wiring, you can't just pull new wire through the old. Now in my case, new wiring for the steaming light HAS been run, and plugs in (sort of) outside the mast. This is a very common way for things like this to be run, so that isn't the issue. What is, however, is the fact that the existing steaming light is absolutely destroyed. It's some form of LED fixture which has exactly nothing left minus an LED board dangling off some wooden bung.


As far as I can tell, it's the only wiring in the mast right now. The masthead has no anchor light, no VHF antenna, no anything at all. So in that spirit, I've ordered up a new LED anchor light, and a cheap steaming/deck light. It's sort of a Forespar knockoff, but it's cheap enough that I don't mind taking a risk on it. The only complaint that people have in the reviews I've read, is that when the wings are curved to match some mast angles, it could potentially deform the fixture enough that it could compromise the way things line up. My thinking, is that it's a plastic/composite fixture. A little heat should allow that to be formed without hardly any issues. Guess we'll see.


The anchor light is just some cheap all-round LED that should at least do something. My original plan was to just hoist a lantern, which I'll likely still do. But for fifteen bucks, and I already have the wire, why not throw on up anyway? Maybe I'll get lucky and this one will actually work, unlike the last one I had on my other boat.

And then in direct contrast, I ordered LMR-400 VHF cable to run up the mast, and to tie into the existing whip antenna that I found in the boat to mount. There are variations of VHF cable qualities, but in most threads I've read, the 400 seems to be at the, if not the top of the list for quality and signal loss in practical boating applications. That is to say that yes, there are physically better choices but the cost/weight/etcs hit a point where it isn't beneficial to sacrifice towards. The existing VHF radio that was mounted, was just run to an eight foot fiberglass whip mounted on the stern, but there IS a VHF barrel connector on the deck for the mast, just missing the cable run from there through the cabin to the radio. So at the very least, the cable will run from the masthead antenna to the deck. I plan on using the old radio for the time being, and then I might upgrade it next year. If you're curious as to just what kind of differences there are between the cable choices, here's a good chart:

Attenuation of Coaxial Transmission Lines in the VHF/UHF/Microwave Amateur and ISM Bands


Cable Type144 MHz220 MHz450 MHz915 MHz1.2 GHz2.4 GHz5.8 GHz
RG-586.2(20.3)7.4(24.3)10.6(34.8)16.5(54.1)21.1(69.2)32.2(105.6)51.6(169.2)
RG-8X4.7(15.4)6.0(19.7)8.6(28.2)12.8(42.0)15.9(52.8)23.1(75.8)40.9(134.2)
LMR-2403.0(9.8)3.7(12.1)5.3(17.4)7.6(24.9)9.2(30.2)12.9(42.3)20.4(66.9)
RG-213/2142.8(9.2)3.5(11.5)5.2(17.1)8.0(26.2)10.1(33.1)15.2(49.9)28.6(93.8)
99131.6(5.2)1.9(6.2)2.8(9.2)4.2(13.8)5.2(17.1)7.7(25.3)13.8(45.3)
LMR-4001.5(4.9)1.8(5.9)2.7(8.9)3.9(12.8)4.8(15.7)6.8(22.3)10.8(35.4)
3/8" LDF1.3(4.3)1.6(5.2)2.3(7.5)3.4(11.2)4.2(13.8)5.9(19.4)8.1(26.6)
LMR-6000.96(3.1)1.2(3.9)1.7(5.6)2.5(8.2)3.1(10.2)4.4(14.4)7.3(23.9)
1/2" LDF0.85(2.8)1.1(3.6)1.5(4.9)2.2(7.2)2.7(8.9)3.9(12.8)6.6(21.6)
7/8" LDF0.46(1.5)0.56(2.1)0.83(2.7)1.2(3.9)1.5(4.9)2.3(7.5)3.8(12.5)
1 1/4" LDF0.34(1.1)0.42(1.4)0.62(2.0)0.91(3.0)1.1(3.6)1.7(5.6)2.8(9.2)
1 5/8" LDF0.28(0.92)0.35(1.1)0.52(1.7)0.77(2.5)0.96(3.1)1.4(4.6)2.5(8.2)
Attenuation of Various Transmission Lines in
Amateur and ISM Bands in dB/ 100 ft (dB/ 100 m)


One thing that I AM excited about though is something my brother and I stumbled across in some searches for a project he's working on. One thing that I always see threads on forums about, is some sort of wiring connector at the mast. Most are somewhat flimsy 4-pin connectors or something, and frankly, the one I ordered for the Ex 26 I had, ended up being pretty poorly built. Now, you are free to point out the price. And I will be the first to admit that yes, it was very cheap and likely the main reason for failure. But if I'm honest, there are quite a few very similar ones, and I've seen them sell for upwards of thirty dollars. For reference, what I had was:


And every time I look for a waterproof deck connector, I always find the same kind of deal. I was almost resigned to using a trailer wiring plug. But when we were stumbling across other things unrelated, we found a company called CNLINKO, that manufactures waterproof connectors for various applications, including optical and USB. My brother ordered one, and was very impressed, so I decided to order a 1/4 turn locking 4 pin combo that I'm looking forward to seeing, in the following style:

http://cnlinko.com/Products/65_30.html


Oh, remember that whole "I have nice shiny new batteries" thing? Let's revisit my Excalibur 26. Two nice GC2 golf cart batteries, and a Renogy Solar 100 watt panel and PWM controller. I've already mounted two new batteries on this boat, but I've only had a little 5 watt panel sitting out on the cockpit seat to feed them through a brand new Victron 75|15 controller. There's nothing drawing on the batteries right now, nothing is hooked up. But it won't be long before it's being used, and that little panel MIGHT be able to veryyyyy slowlyyy try to top batteries off over a week that I'm not there. But why tempt fate, right? I ordered a new HQST 100 watt monocrystalline solar panel, extension cables, and a waterproof deck seal connector. I fully intended to go with the Renogy again, and to be completely fair, I've read reviews comparing the two with mixed results. They have great reviews on this as well, and as one comment pointed out, these are manufactured by Renogy for distribution by HQST. This panel is about twenty dollars cheaper, so they must have skimped somewhere, you would think. But the problem is that there are reviews where people have purchased both panels and found them to be virtually identical. There are also a couple that maintain that they are in fact, NOT the same panel, and these are inferior. So, while I do plan on a second panel before the end of summer, I figured I'd at least give this one a go, and see how it compared to the one I had before.

All in all, it's shaping up to be a pretty good last week of preparation. The idea is to have all these things in for next week, and since I have the first week in May scheduled off, next weekend will be all the actual boat work and final prep, and then launch the next week and... who knows!

The disorder of it all

This weekend I plan on going up and taking care of some things on the boat, weather permitting. I have more goodies coming in tomorrow that will help that process. Not the weather, but the working. And when looking over the list, my first thought was, wow, I sure do things in a sporadic nature. Certainly not how I watch other people do it. That's when I realized that since I'm not in the business of producing nice shiny videos for others to watch, it's not a big issue.

Now a normal person, for example, will look at a project and make a list of everything that's needed, purchase it all at once, and complete the project. Do I look normal to you? To be fair, there's a lot of little projects to be done. It's not as if I'm building a shed or something. This is why you'll see me talk about buying one piece here, then something completely unrelated the next week, and so on. See, it doesn't matter how one does a puzzle. Some ways might be more efficient, like doing the borders and corners first. But as long as the end result is still a completed picture, it matters little the process taken.

Another thing you might notice is that I'm a fan of Amazon. Partially because I have the Prime membership so shipping is quick and painless, and more than partially because the pricing on a lot of things is hard to beat. Don't get me wrong, I am a strong fan of Defender, and have used them for a lot in the past - and will do so again. But I also have found that for a lot of incidental things, the price is relatively close between the two, and shipping would be the same time frame. By the time you factor in paying the little extra shipping for Defender, it's mostly a wash on things anyway. And there's an added bonus.

Did you know that if you go to http://smile.amazon.com instead of the regular www link, you can pick a charity to have money donated to, because of your purchase? It doesn't cost you anything different, but Amazon donates a % of the purchase to them. They are small numbers to be sure, but if you look at the grand scheme of everyone? It really adds up, and is a really cool thing to have happen. For example, you might think you aren't having an impact. I've placed 25 qualifying orders through Amazon, and have managed a paltry $11 dollars of impact for the charity I had chosen (and which can be changed at any time). However, combined, this charity alone has seen just under 2 million dollars raised. That's million. And total charitable contributions through the Smile program have exceed seventy million dollars. All without any addition costs to us, the consumers. All without asking me to spare a dollar in a checkout line.

Go ahead, try it. I dare you.


Wiring Part 1. Unwiring?

This past weekend, my dad went along with me on a day trip up to the boat to do some preliminary assessing of my wiring mess. Well, I already knew it was a mess. Maybe I just wanted someone to go "Wow, you weren't kidding!"

Before heading up, I stopped at the Sam's Club near where I'd be meeting my dad to pick up a pair of golf cart 6v batteries. When I had my Excalibur, I had two GC2 batteries, fed by a Renogy Solar 100 watt solar panel and controller kit. While I had originally wanted to double that bank, I recently decided that if it worked on that boat, it can work on this one as well since I don't plan on doing anything differently as far as usage. Let's recap a little about these batteries though.

The 6 volt golf cart battery is a common house bank choice. The Trojan T105 battery has long been the standard for these, but a very well-recommended alternative is the GC2 from Sam's Club, branded by Duracell. I won't get into actual manufacturing and whatnot. The GC2 is a slight bit lower capacity but a good chunk less in price, and maintained properly will give a good result. They also sell an EGC2 battery which steps up the amp-hours a notch at a cost of an additional $30 per battery - the GC2 is rated at 215 amp-hours, the EGC2 is 230. Comparatively, the Trojan is rated at 225. Considering that you need at least two batteries to form a 12 volt bank, and the cheapest I've seen a Trojan listed was $170 dollars, and the GC2 is half that, well.. do the math. And it's exponentially more cost-effective as your bank grows larger.

Now that our battery lesson is out of the way, I'll tell you why I told you the story. As I mentioned, I went to Sam's to pick up my pair of batteries. The EGC2 battery is a gray casing, the standard GC2 is black. Now I had remembered that the higher capacity batteries were a few dollars more for a few more amps, but couldn't remember the exact pricing and differences. As I stare at the display, I see the GC8s sitting there at 99 bucks versus the $84 GC2 next to it. So to myself, I think well heck, for fifteen bucks, I'll go for the upgrade, and tossed them in my cart. Some of you see what I did there.

I checked out, and headed towards my dad. As I did, I decided to do a follow up to see just how many more amp hours I bought myself. Obviously in no way was I researching while driving, the search for my newly purchased GC8 battery revealed a very startling first line.


Go ahead. See if you can see my sudden realization. I'll wait. Yes, friends. I purchased two 8 volt batteries. And for having a 12 volt system on the boat, this presents a bit of a puzzle. So, picked dad up, went back, and exchanged for the correct GC2 batteries. Off to a good start.

The drive was as expected, on new wheel bearings in my car. Side note, jumping your car off the road into a snowy ditch for a couple hundred feet, doesn't work out well for those. But once there, we unloaded all the junk - er, gear - I brought with us, including my handy little mighty ladder to give us access. I gave the brief tour into the boat, and pointed out the mess we were going to tackle. Then we moved the mast aft about ten feet so that I could get an idea of the masthead sheave issue, and peek into the anchor locker. Note to self - new anchor and chain to be ordered.

Pointing into the rat's nest of wiring, I gave my dad an idea of what had baffled me earlier. Because we were both toying with yanking on wires, I didn't take many pictures. So suffice it to say, it was just ripping out most of everything.


Sadly, I can't even remember what direction this angle was even facing! But we also tackled into removing the AC wiring, everything this side of the shore power connector on the hull. Here, you can see the old-school style AC breaker box amidst the mess.


It took a bit over an hour or so to finally cut loose all the old wiring, the ties, untangle them, and then the hard part - removing the existing switches. If I can find a picture somewhere I'll add it, but basically they, and the fuseholders for those that were equipped, were just drilled in holes in the liner above the quarter berth. Very not cool. I found the easiest way to remove the nuts from the back of the fuse holders, was to simply grab the whole assembly with pliers, give a quick twist and just shatter the whole assembly which would then fall back out of the hole. The switches were mostly old style metal casings so they took some more effort but in the end, success. 

A neat little feature that most Newport 28 owners might have overlooked, is that if you remove the Atomic 4 from the engine compartment, it makes a great place to store a pair of batteries!


Obviously, these aren't locked down, or anything, but I wanted to see how well they would fit. I propped them up on some small wooden pieces laying around to keep them up off the hull itself for fear of condensation/freezing. But I think a pair fits quite nicely. The plan is to use some 3/8 plywood and make a box of sorts, that will look similar to an H, that will sit in there, allowing for space underneath, the batteries sit on the cross, and I can add anchors within the box to hold them down, as well as strap the box itself to the old engine mounts. Plenty of time to get there, but that's the plan. I managed to sort out which wire went to the stern light. That was as far as the tracing went before we called it a day and left for dinner on the way home.

We did, before we moved the mast back forward to eliminate the stern pressure, was to pull the two remaining masthead sheaves from it. They're the old style composites, measuring 2 3/4" in diameter, 1/2" thick (outside to outside) and with a 3/8" hole for the pin. So far, I've found some that were CLOSE that would work, but I finally found my way back to Ballanger Spars webpage. I had ordered my hinged mast step from them for my last boat, and knew he did mast work but I didn't think about sheaves. Sure enough, he has the exact size listed in his catalog, in aluminum for only $24 apiece. Since the two I have left are in fine shape, I'll place an order for two more, and get the masthead in shape within the next few weeks. 

I will say though, it was nice not having to lug those batteries back down the ladder afterwards. I didn't mention that above. Anyone planning on retrofitting some of these into a house bank, or replacing existing, and if you care about weight.. They're about 68 lbs each. Yes, my ladder held up as I carried each up to the top. 

Hopefully it'll only be a couple more weekends before I get up and start stringing new wire, with more pictures of that side of it. Really, taking things apart is pretty boring anyway.

Catching up

 Well then, I guess it's time to figure out where we've been and where we go next.  The shed project moved along nicely. Quite, in f...